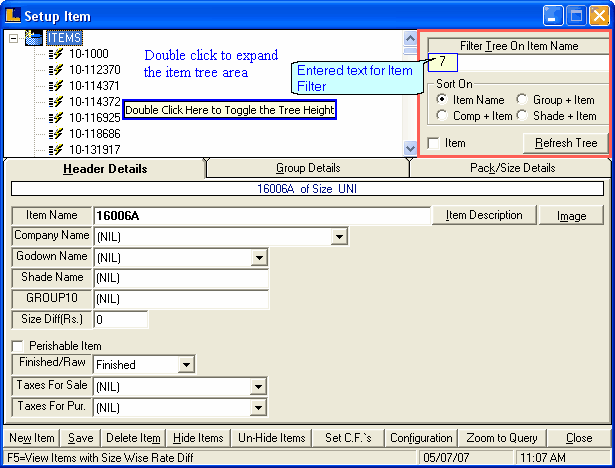
In this section the pack and size details are provided to the item.For this click the Pack/Sizes tab or press Alt+K.
Ā
Ā
?
|
Pack Name : To assign the pack name to the item press the space bar > Pack/Search List dialog box appears > select the pack from the existing packs or user can also crate a new pack > press Enter.User can not assign Item Code if the Pack Name is not assigned
|
Ā
?
|
Do Not Print Bar Code :If you want to print the barcode of the Item then check the box else remained unchecked.This can also be done in the Configuration.Click the Configuration button or press Alt+F check the Do not Print The Bar Code as shown below :
|
Ā
?
|
Item Code : Item code can be generated in various formats.An item Code consist of three parts Prefix,Middle and Post Fix.To get the formats click the Configuration button or press Alt+ F.
|
Ā
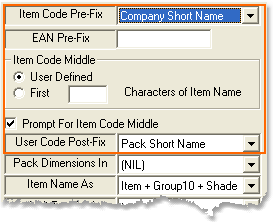
How To Set Pre-Fix For Codes : Select the type of prefixes for codes from the list.There are six types of prefixes :-
Ā
1.
|
User Define : User can define the prefix according to the requirements.
|
2.
|
Company Short Name : Company Short Name appears as the prefix of the Item Code.
|
3.
|
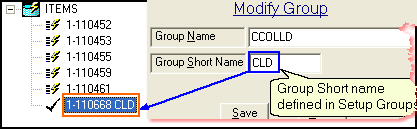
Group Short Name : Group Short Name appears as the prefix of the Item Code.
|
4.
|
Company S.Name+1 : It is a auto generated Item Code. Company Short Name appears as the prefix of the every Item Code with an automatic increment by one to next Item code.
|
5.
|
EAN -13 : It is an International Bar Code Standard of PF-7 Characters.If select this as prefix then define any seven characters code in the text box.
|
6.
|
EAN Pre-Fix+1 : It is a auto generated Item Code.EAN-13 appears as the prefix of the every Item Code with Āan automatic increment by one to next Item code.
|
Ā
How To Set Middle Item Codes : The Middle item code can be defined in three ways :-
Ā
1.
|
User Define : User can defined the middle name according to the requirements.
|
2.
|
Some Characters Of Item : Enter the number of characters of the item name you want to see as Item Middle Code.
|
3.
|
Prompt For Item Code Middle : If Āthis box is checked then user can able to edit the middle code manually.
|
Ā
How To Set Post-Fix Item Code : The Post Item Code can be defined in two ways :-
Ā
1.
|
User Define : User can define the code according to the requirements.
|
2.
|
Pack Short Name : Select the option from the list then pack short name appears as the post item code.
|
Ā
ŲNote : If the Item Code box is checked then user can able to edit only the middle code.
|
Ā
?
|
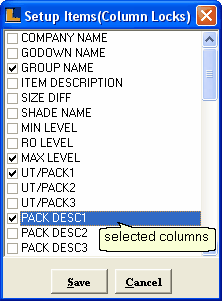
Additional (Addl) Item Code : Enter the Additional item codes if required.The additional item code column can belocked to enter additional item code.To lock the column click the Configuration button or press Alt+F > click on Column Locks button > check the Additional IT code box and click on Save button or press Alt+S.It ia an optional column.
|
Ā
?
|
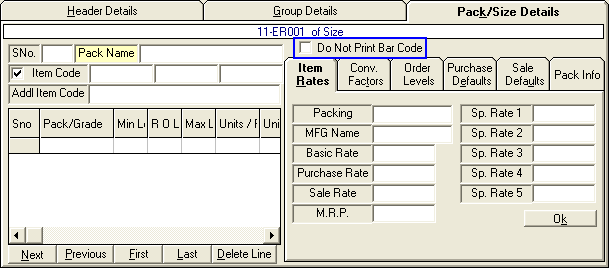
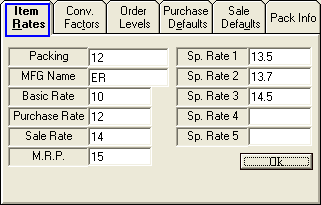
Item Rates (Alt+R) : This tab contains the different rates related to the item as shown in the figure.These are the optional values can be left blank.By default Zero value is assigned to the rates.
|
Ā
Ā
?
|
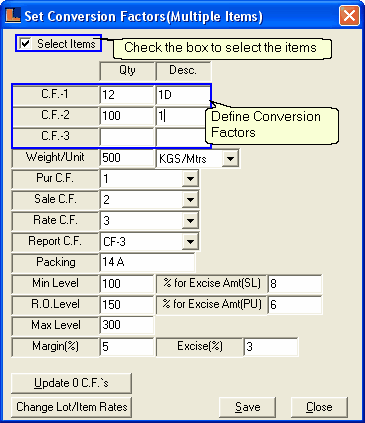
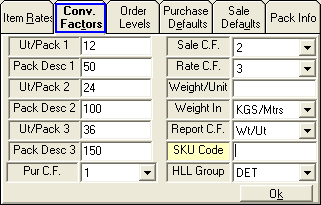
Conversion (Conv) Factor : Conversion Factor is a kind of scale to define the group of items.
|
For example : 1 Dozen=12 items
Ā
Ā
?
|
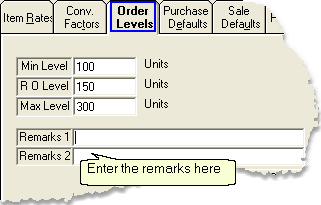
Order Levels : Three types of order level are defined under this tab :-
|
Ā
Minimum (Min) Level :The minimum number of units that mist be ordered.
Reorder (R O) Level : The number of items that can be reordered.
Maximum (Max) Level : The maximum number of units that can be ordered.Order of items can't exceed the Max Limit.
Ā
Ā
?
|
Purchase Defaults(Alt+E) : This tab contains the different types of the taxes,discount,margin etc.Must mention the Days To Expiry if the item is Perishable.
|
Ā

?
|
Sale Defaults(Alt+U) : This tab contains the information of discounts related to the Sale of the item.
|
Ā

Ā
?
|
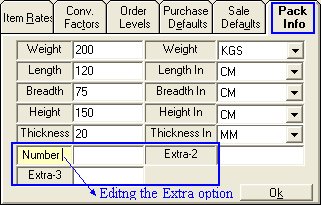
Pack Info : This tab contains the information of the different dimensions of the pack.For example : length,weight,thickness etc.This tab contains three Extra options whose names can be changed by the user by double clicking the option.
|
Ā
After entering all the detail related to the item click on Save button or press Alt+S to save the new item.
|