Fix Value Source
 Source: Source tab opens up options like Fix Value where you can manually enter the label's text as per your need. User can give a fix value to the label or your record. Source: Source tab opens up options like Fix Value where you can manually enter the label's text as per your need. User can give a fix value to the label or your record.
 Fix Value Text: You can give any name to your fix value source. Fix Value Text: You can give any name to your fix value source.
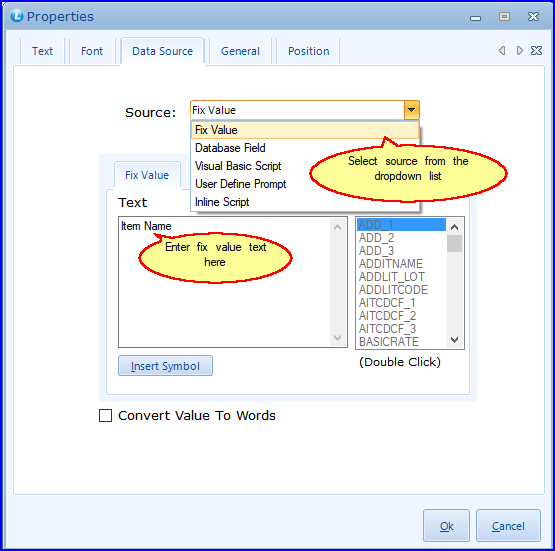
FIG 2. LABEL PROPERTIES
 On deciding the fix value of the label it will appear in the blank space as shown in the below figure. On deciding the fix value of the label it will appear in the blank space as shown in the below figure.
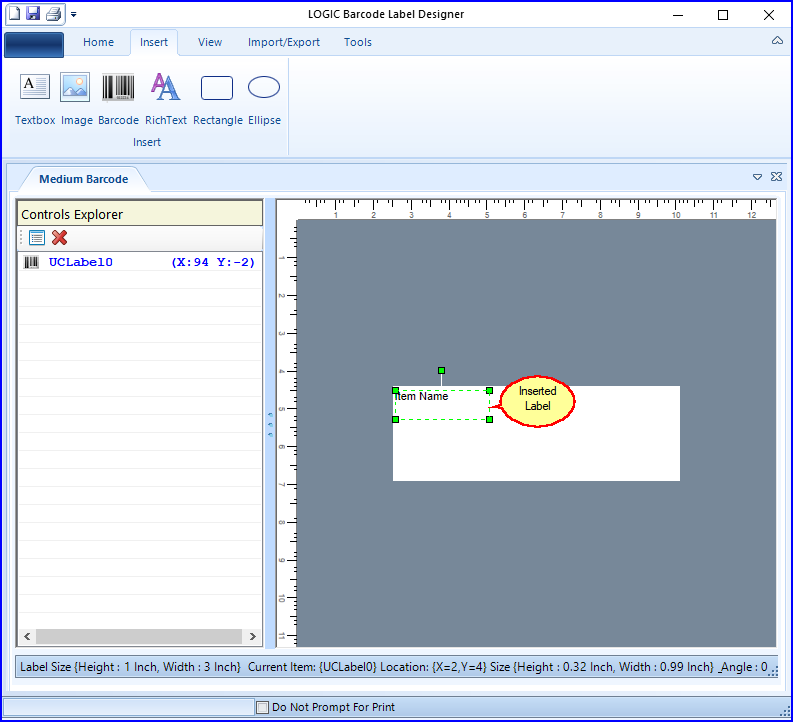
FIG 3. BARCODE DESIGNER
Back To Top
Database Field
 Once you have selected your Data source then you need to go to database to choose the fix value text in the database to make it appear in the blank space as you will see in the steps seen below. Once you have selected your Data source then you need to go to database to choose the fix value text in the database to make it appear in the blank space as you will see in the steps seen below.
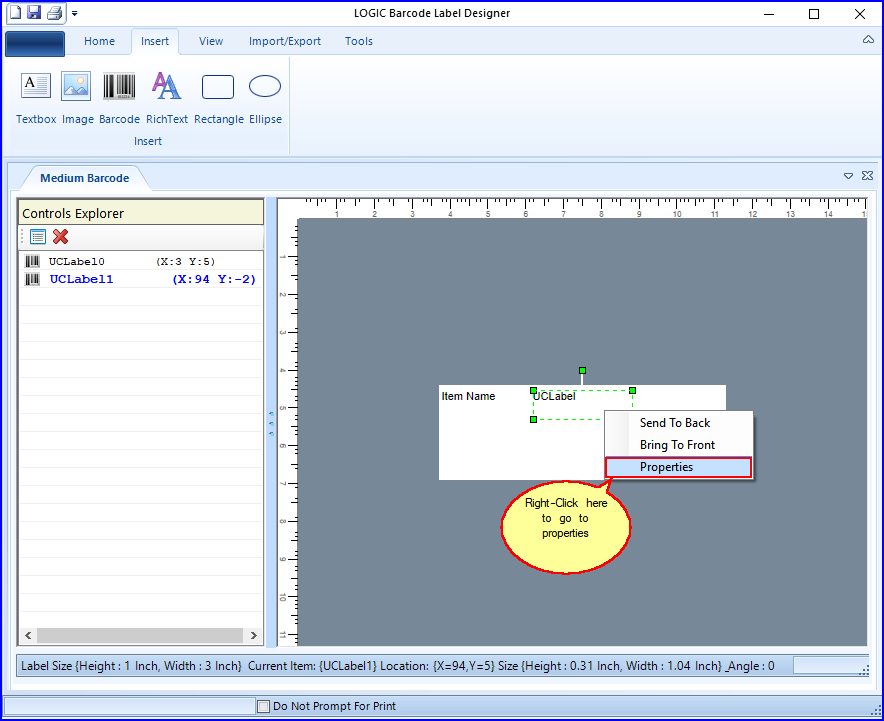
FIG 4. BARCODE DESIGNER
 You can select Database field and select any field value from the drop down list. You can select Database field and select any field value from the drop down list.
 Field Name: Database field lets you choose from the drop down list to select the source you want to set in the bar code. Field Name: Database field lets you choose from the drop down list to select the source you want to set in the bar code.
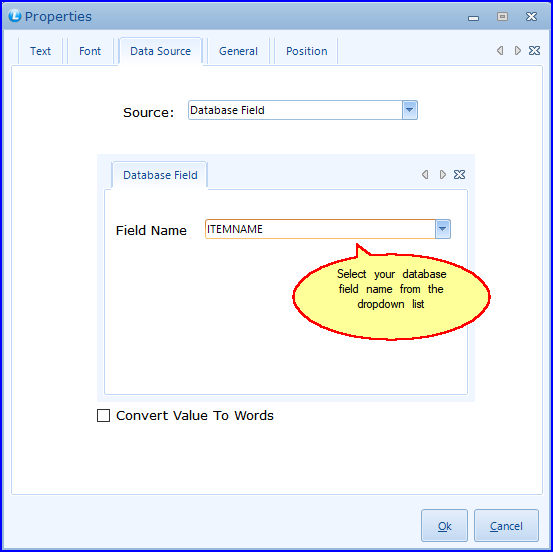
FIG 5. LABEL PROPERTIES
 Once you select your particular database field it will appear in the figure seen below. Once you select your particular database field it will appear in the figure seen below.
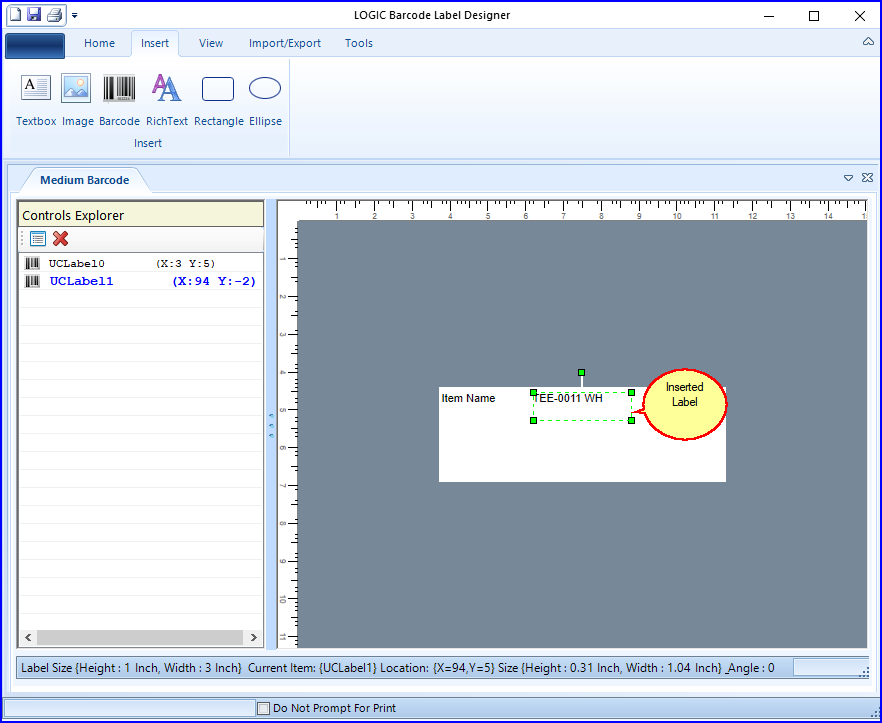
FIG 6. BARCODE DESIGNER
Back To Top
Visual Basic Script
 Visual Basic Script is a general purpose scripting language and in this case used for barcode design. This is an advanced method for scripting language through which you can add value to your barcode design. Visual Basic Script is a general purpose scripting language and in this case used for barcode design. This is an advanced method for scripting language through which you can add value to your barcode design.
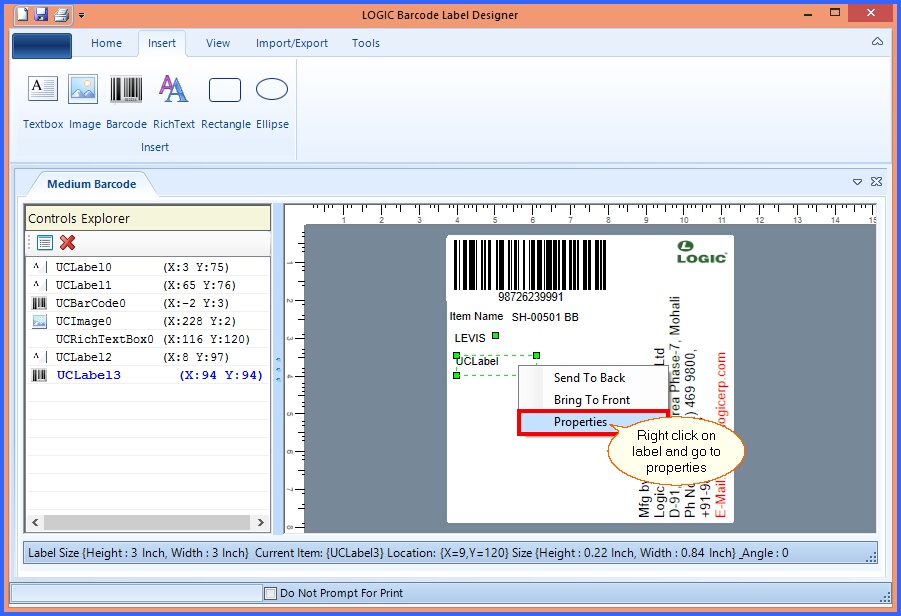
FIG 7. VISUAL BASIC SCRIPT
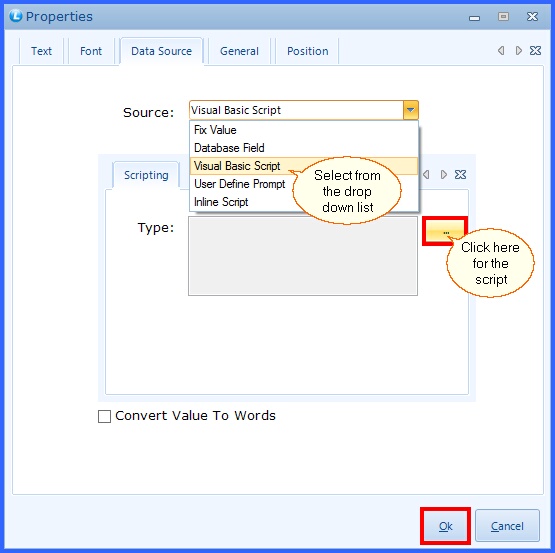
FIG 8. VISUAL BASIC SCRIPT
 On clicking for the script as shown in the window above the figure seen below will appear. On clicking for the script as shown in the window above the figure seen below will appear.
 Field List: Field list as shown below shows you three options like Add or Delete any field name you want to use in Visual basic script to add to barcode design. You can also click on View option opening up the field name under the heading of "Field Current Value" like "Script Editor" seen below. Field List: Field list as shown below shows you three options like Add or Delete any field name you want to use in Visual basic script to add to barcode design. You can also click on View option opening up the field name under the heading of "Field Current Value" like "Script Editor" seen below.
 You can then Save, Cancel or Execute the written script in the space given below. You can then Save, Cancel or Execute the written script in the space given below.
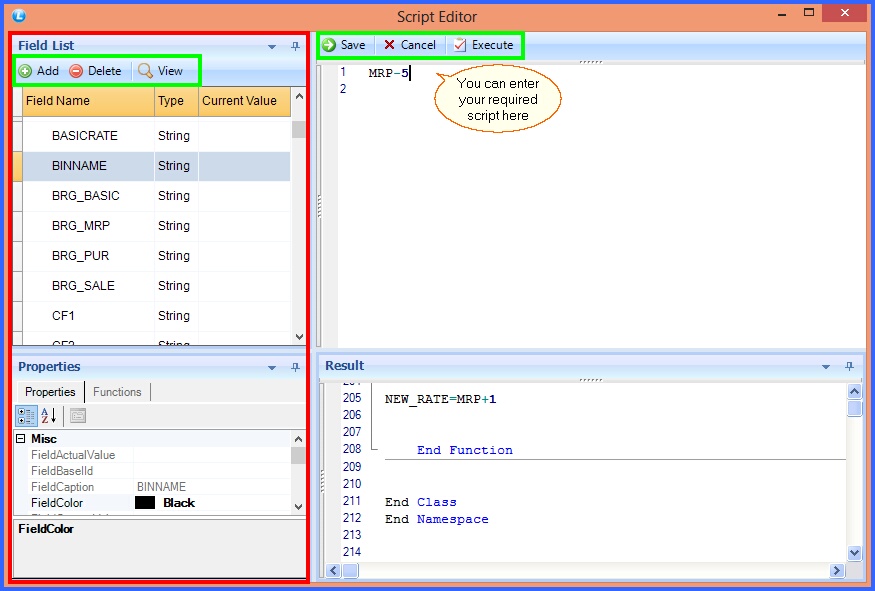
FIG 9. VISUAL BASIC SCRIPT
User Define Prompt
 User defined script is added to the label to provide additional data or information manually given by the user. It is primarily in use at the time of of printing or print preview. User define prompt gives you certain in built functions for easy access to certain aspects of barcode design. User defined script is added to the label to provide additional data or information manually given by the user. It is primarily in use at the time of of printing or print preview. User define prompt gives you certain in built functions for easy access to certain aspects of barcode design.
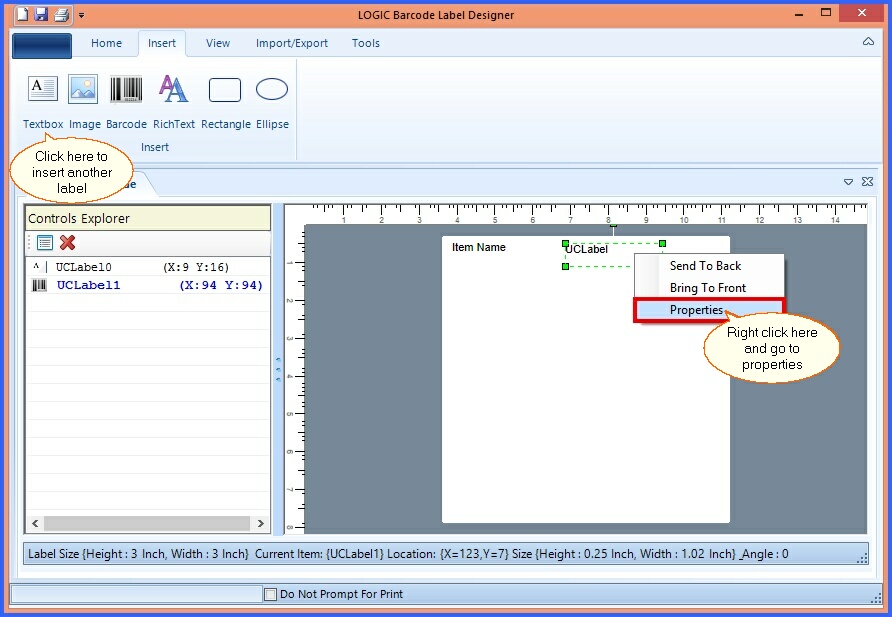
FIG 10. BARCODE DESIGNER
 Once you right click on the label the following seen window will open where the user will select the option of "User Define Prompt" Once you right click on the label the following seen window will open where the user will select the option of "User Define Prompt"
 It will open the button of "Setup Prompt" which the user will click for the next step. It will open the button of "Setup Prompt" which the user will click for the next step.
 The window will also carry a optional tick you can choose to use in the form of "Convert value to words" which converts your text to words on the printed label. The window will also carry a optional tick you can choose to use in the form of "Convert value to words" which converts your text to words on the printed label.
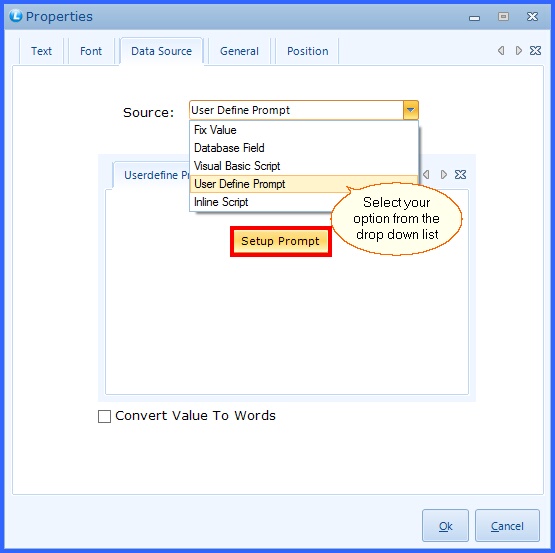
FIG 11. USER DEFINED SCRIPT
 Once you click on "Setup Prompt" the following seen window will open up. Once you click on "Setup Prompt" the following seen window will open up.
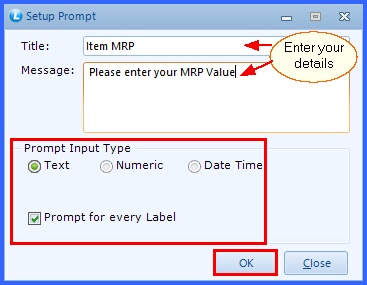
FIG 12. SETUP PROMPT
 Prompt Input Type is divided into three types for whatever input user may require in the barcode design Prompt Input Type is divided into three types for whatever input user may require in the barcode design
 Text Text
 Text variety of the Prompt Input Type will open the figure seen below. Text variety of the Prompt Input Type will open the figure seen below.

FIG 13. SETUP PROMPT
|
 Numeric Numeric
 Numeric Variety of the Prompt Input Type will open up the figure seen below. Numeric Variety of the Prompt Input Type will open up the figure seen below.
 User can also manually enter the "Decimal Length" by clicking in the space given. User can also manually enter the "Decimal Length" by clicking in the space given.
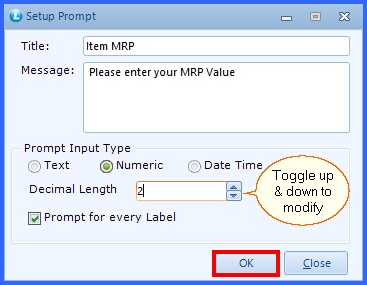
FIG 14. SETUP PROMPT
|
 Date Time Date Time
 Date Time Variety of the Prompt Input Type will open up the figure seen below. Date Time Variety of the Prompt Input Type will open up the figure seen below.
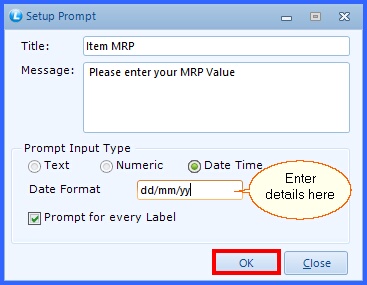
FIG 15. SETUP PROMPT
|
 "Prompt for every Label" optional tick means if you tick here then the title & message will appear for every label. "Prompt for every Label" optional tick means if you tick here then the title & message will appear for every label.
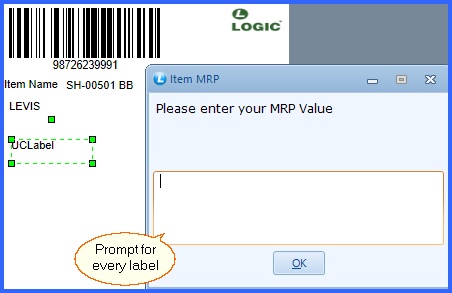
FIG 16. SETUP PROMPT
Inline Script:
 Inline Script is used in the barcode design for a much simpler way of modifying details in barcode design where the items from field list can be selected to add to barcode design. It is a simple design format and has limited field items to choose from to which you can add your calculations. Inline Script is used in the barcode design for a much simpler way of modifying details in barcode design where the items from field list can be selected to add to barcode design. It is a simple design format and has limited field items to choose from to which you can add your calculations.
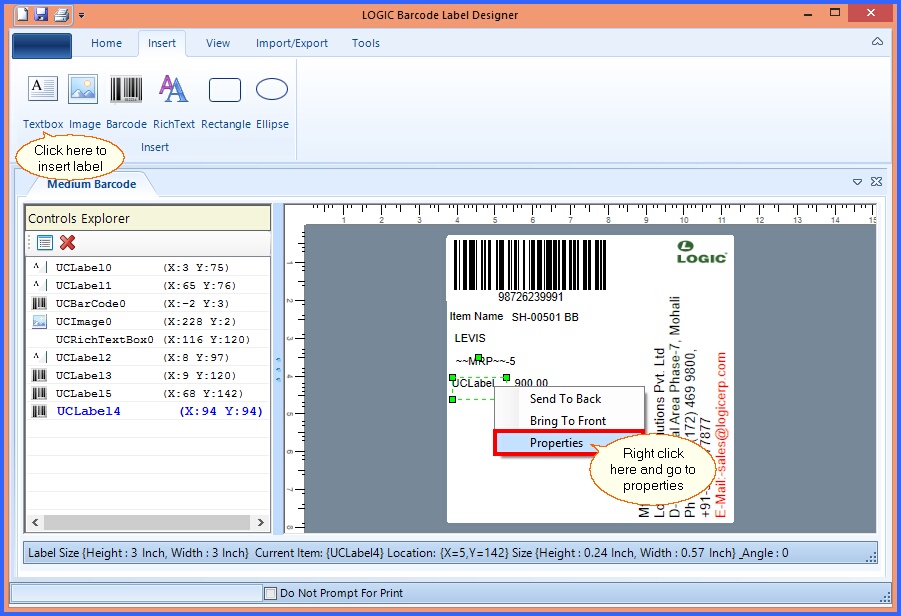
FIG 17. BARCODE DESIGNER
 On going to properties the following window will appear. On going to properties the following window will appear.
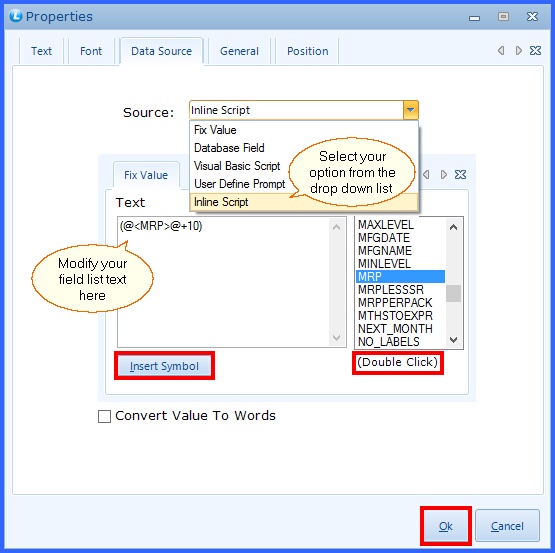
FIG 18. BARCODE DESIGNER
 On following the window of Inline script it will appear in the barcode design below than Visual basic script. For example:- MRP is shown equal to 900 and we add the inline script shown in Fig. 18 the added inline script is visible in the figure below. On following the window of Inline script it will appear in the barcode design below than Visual basic script. For example:- MRP is shown equal to 900 and we add the inline script shown in Fig. 18 the added inline script is visible in the figure below.
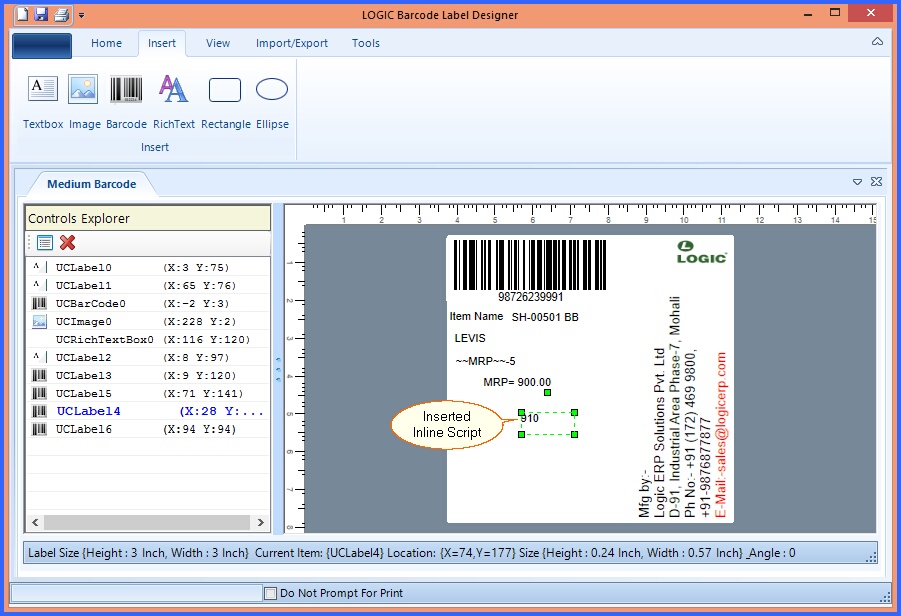
FIG 19. BARCODE DESIGN
|
![]() You can click on the option "Textbox" and the result may look something like shown in the figure below. To insert the label from the tool bar click the label option.The label get inserted in the blank area.Now set the properties related to the label.It is optional to insert the label in the barcode.User can resize the label.User can insert the label if required.
You can click on the option "Textbox" and the result may look something like shown in the figure below. To insert the label from the tool bar click the label option.The label get inserted in the blank area.Now set the properties related to the label.It is optional to insert the label in the barcode.User can resize the label.User can insert the label if required.