The Other Details button is activated only if Account Type is set to Customer/Supplier/Capital/Fixed Assets. A form opens up which lets the user enter the entire details like name of the person to be contacted, address, bank details, contact number etc. The user can specify the name of the Transporter. The Transporter select Box is filled after the user has entered Transport Names in Setup Transport Form.The user can also mention the Bill and Add percentage Limits.
![]() Address Details Of The Account
Address Details Of The Account
Address Details Of The Account: |
![]() Now click on Other Details in Fig 2 and you will get the screen as shown below. Now enter the following common details related to the every new account:
Now click on Other Details in Fig 2 and you will get the screen as shown below. Now enter the following common details related to the every new account:
![]() You can specify the country & city of the party. The country & city select box is filled after the user has entered country names in Setup Country and city names in Setup City.
You can specify the country & city of the party. The country & city select box is filled after the user has entered country names in Setup Country and city names in Setup City.
![]() Address 1&2: Enter the address of the party.
Address 1&2: Enter the address of the party.
![]() Telephone: Enter the Telephone number.
Telephone: Enter the Telephone number.
![]() Mobile No: Enter the mobile number of the company.
Mobile No: Enter the mobile number of the company.
![]() E-mail: Enter the E-mail address that will be used to e-mail documents, reports and data to the party.
E-mail: Enter the E-mail address that will be used to e-mail documents, reports and data to the party.
![]() Cst No: Enter the Central Sales Tax No issued to the party.
Cst No: Enter the Central Sales Tax No issued to the party.
![]() Cst Date: Enter the Cst date of the party.
Cst Date: Enter the Cst date of the party.
![]() Lst No: Enter the Local Sales Tax No issued to the party.
Lst No: Enter the Local Sales Tax No issued to the party.
![]() Lst Date: Enter the Lst Date of the party.
Lst Date: Enter the Lst Date of the party.
![]() Tin No: Enter the Taxpayer Identification No issued to the party.
Tin No: Enter the Taxpayer Identification No issued to the party.
![]() Sale Nature: Sale nature of the party is selected from the drop down option on the basis of their sale.
Sale Nature: Sale nature of the party is selected from the drop down option on the basis of their sale.
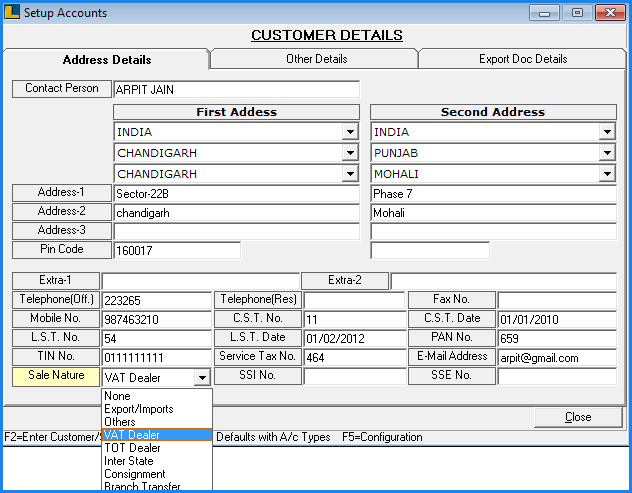
Fig 1. Address Details
Other Details Of The Account: |
![]() The user can specify the name of the Transporter. The transporter select Box is filled after the user has entered transport names in Setup Transport form.
The user can specify the name of the Transporter. The transporter select Box is filled after the user has entered transport names in Setup Transport form.
![]() The user can also mention the bill and add percentage limits.
The user can also mention the bill and add percentage limits.
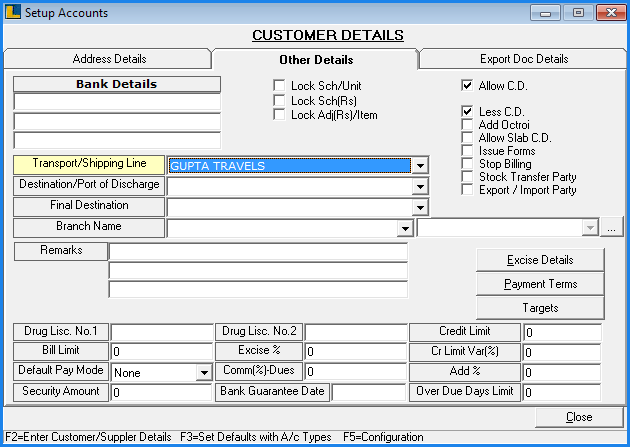
Fig 2. Other Details
Limits (Bill & Add):
![]() Bill Limit: The user can specify the Bill Limit which is the maximum bill amount. If the bill amount exceeds the bill limit then the user is informed about the maximum bill limit specified.
Bill Limit: The user can specify the Bill Limit which is the maximum bill amount. If the bill amount exceeds the bill limit then the user is informed about the maximum bill limit specified.
![]() Add percentage: The user can specify the default Add (%) that will be added to bill amount for a particular party. If user has set the percentage for the party then at the time of billing it will add the specified percentage in the bill amount for the particular party.
Add percentage: The user can specify the default Add (%) that will be added to bill amount for a particular party. If user has set the percentage for the party then at the time of billing it will add the specified percentage in the bill amount for the particular party.
Allow & Less C.D:
![]() If the user tick the box then it allows C.D i.e cash discount for the party at the time of the billing.
If the user tick the box then it allows C.D i.e cash discount for the party at the time of the billing.
![]() If user un-tick the box then it do not allow C.D i.e cash discount for the party at the time of the billing.
If user un-tick the box then it do not allow C.D i.e cash discount for the party at the time of the billing.
Payment Terms:
![]() This form enables the user to specify the number of days. Details can be entered in this form only if the account type is set to Customer / Supplier / Capital / Fixed Assets.
This form enables the user to specify the number of days. Details can be entered in this form only if the account type is set to Customer / Supplier / Capital / Fixed Assets.
![]() To view the Payment Terms, go to the Other Details and click on Payment Terms as shown in the Fig 2.
To view the Payment Terms, go to the Other Details and click on Payment Terms as shown in the Fig 2.
![]() The user can specify either the Discount Percentage or the Interest Percentage:
The user can specify either the Discount Percentage or the Interest Percentage:
| • | If the user specifies the Discount Percentage then if the payment is made within the specified days then the user will be given the specified discount on the bill amount. |
| • | If the Interest Percentage is specified then if the payment is not made within the specified days then the user will be charged that much interest on the bill amount.This interest percentage is charged after the number of days exceed the credit days which are been mentioned in the Enter Opening Bills Receivable/Payable in Enter Opening Trial. |
|
The user can specify either the Interest or the Discount Percentage but both cannot be specified for the same number of days. The user can skip mentioning the Interest/Discount Percentage.
|
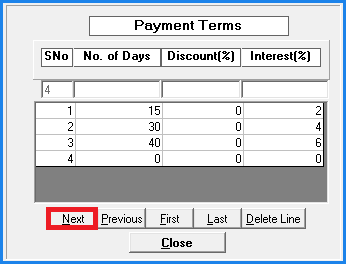
Fig 3. Payment Terms
Function Keys: |
F3 - Set Defaults With A/C Types:
![]() If user want to set defaults for account types then press F3 and the below given screen will appear.
If user want to set defaults for account types then press F3 and the below given screen will appear.
![]() The user can set the fields for Default B.S Group(+), Default B.S Group(-), Default New B.S Group and at the time of the selection of account type in Create New Account, it will by default select all the fields.
The user can set the fields for Default B.S Group(+), Default B.S Group(-), Default New B.S Group and at the time of the selection of account type in Create New Account, it will by default select all the fields.
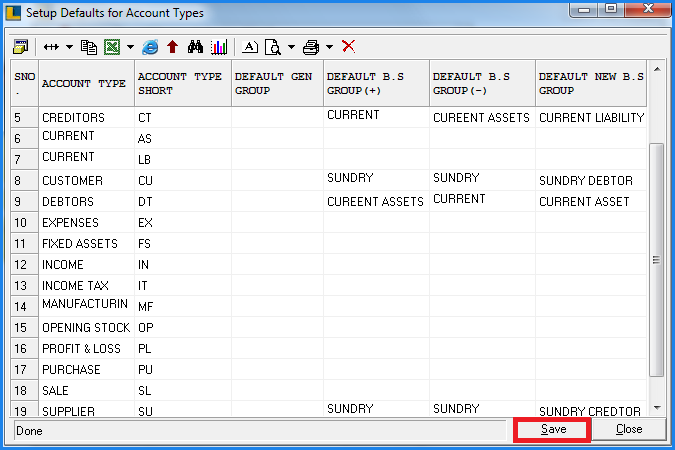
Fig 4. Setup Defaults For Account Types
F5 - Configurations:
![]() If the user want to apply lock in any column, then press F5 button and the below given screen will appear.
If the user want to apply lock in any column, then press F5 button and the below given screen will appear.
![]() Select Column Locks from the options.
Select Column Locks from the options.
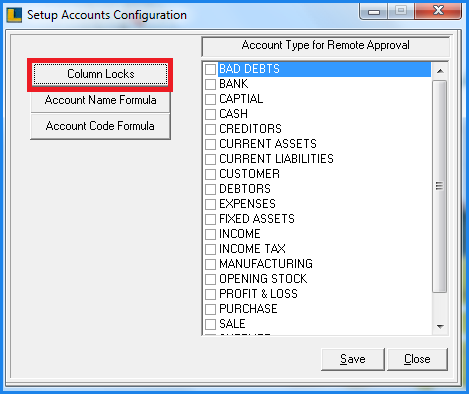
Fig 5. Configurations
![]() Then you can select the columns from the list which is to be locked.
Then you can select the columns from the list which is to be locked.
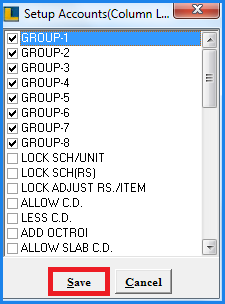
Fig 6. Column Locks