![]() This form enables the user to define Group Wise Taxes for the items.
This form enables the user to define Group Wise Taxes for the items.
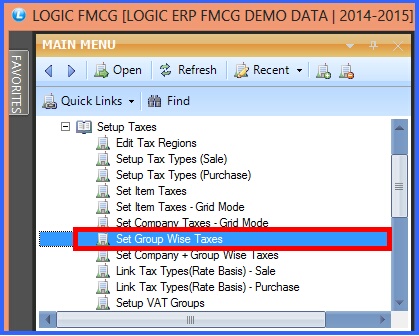
![]() Setup Group Wise Taxes : Main Menu> Setup > Setup Taxes> Setup Group Wise Taxes- Grid Mode.
Setup Group Wise Taxes : Main Menu> Setup > Setup Taxes> Setup Group Wise Taxes- Grid Mode.
FIG 1. MAIN MENU |
Contents:
Set Taxes To Groups :
![]() Select Groups : In order to select the groups check the Select Group box or press Alt+G> Item Group Selection form appears> select the Horizontal Group Level from the list then choose the vertical group and then select the groups and click Ok or press Alt+O. These are the groups which were made in Item Groups Creation.
Select Groups : In order to select the groups check the Select Group box or press Alt+G> Item Group Selection form appears> select the Horizontal Group Level from the list then choose the vertical group and then select the groups and click Ok or press Alt+O. These are the groups which were made in Item Groups Creation.
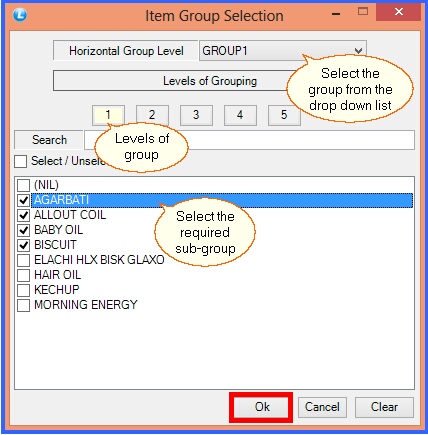
FIG 2. ITEM GROUP SELECTION
![]() Select Tax Region : In order to select Tax Regions check the Tax Region box> Tax Region Selection window appears> select the required Tax Regions and click Ok or press Alt+O.
Select Tax Region : In order to select Tax Regions check the Tax Region box> Tax Region Selection window appears> select the required Tax Regions and click Ok or press Alt+O.
![]() After selecting Group and Tax Region click on Refresh button or press Alt+R to view the selection in the grid.
After selecting Group and Tax Region click on Refresh button or press Alt+R to view the selection in the grid.
![]() In order to define the taxes, select the cell and press space bar> list of taxes appears> select the tax from the list and press enter. After defining all the taxes click on Save button or press Alt+S to save the selections.
In order to define the taxes, select the cell and press space bar> list of taxes appears> select the tax from the list and press enter. After defining all the taxes click on Save button or press Alt+S to save the selections.
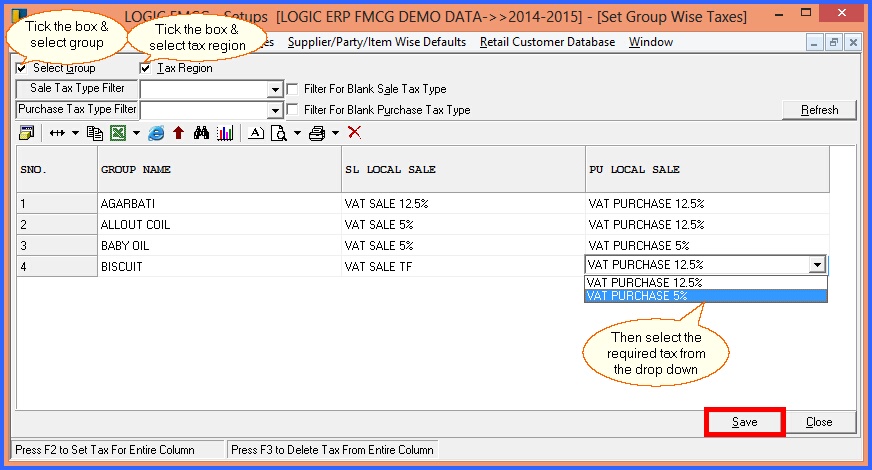
FIG 3. SETUP GROUP WISE TAXES
|
To save the data entered by the user, user have to press enter button and the cursor should be on next line in the grid. |
![]() In order to set the same tax to all the groups > select the column and press F2 or double click > a window appears select the tax name from the list and click Ok or press Alt+O to set the selected tax for all the records. Click on Save button or press Alt+S to save the selections.
In order to set the same tax to all the groups > select the column and press F2 or double click > a window appears select the tax name from the list and click Ok or press Alt+O to set the selected tax for all the records. Click on Save button or press Alt+S to save the selections.
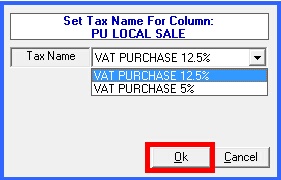
FIG 4. SAME TAXES TO ALL GROUPS
Filtration Of Records:
The Records can be filtered in following ways-
![]() Sale Tax Type Filter : Select the Sale Tax Type from the list and click on Refresh button or press Alt+R. The records with the selected tax type are displayed in the grid.
Sale Tax Type Filter : Select the Sale Tax Type from the list and click on Refresh button or press Alt+R. The records with the selected tax type are displayed in the grid.
![]() Purchase Tax Type Filter : Select the Purchase Tax Type from the list and click on Refresh button or press Alt+R. The records with the selected tax type are displayed in the grid.
Purchase Tax Type Filter : Select the Purchase Tax Type from the list and click on Refresh button or press Alt+R. The records with the selected tax type are displayed in the grid.
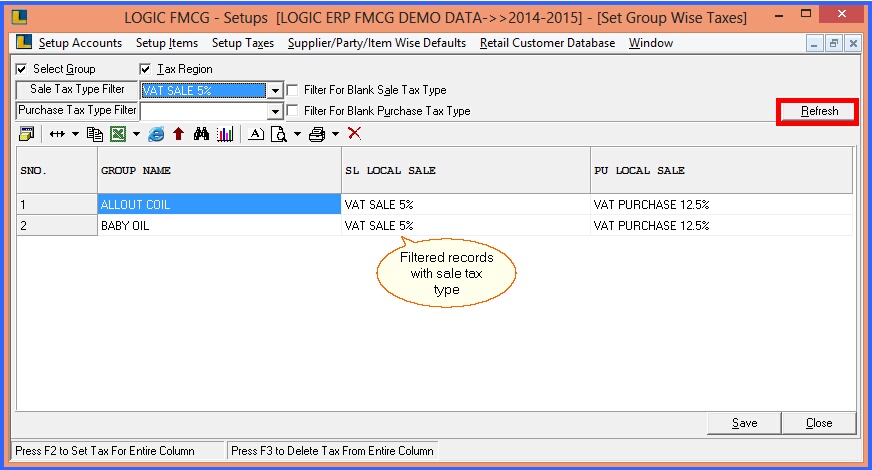
FIG 5. SETUP GROUP WISE TAXES
![]() Filter For Blank Sale Tax Type : In order to view the records with blank Sale Tax, check the box and click on Refresh button or press Alt+R.
Filter For Blank Sale Tax Type : In order to view the records with blank Sale Tax, check the box and click on Refresh button or press Alt+R.
![]() Filter For Blank Purchase Tax Type : In order to view the records with blank Purchase Tax, check the box and click on Refresh button or press Alt+R.
Filter For Blank Purchase Tax Type : In order to view the records with blank Purchase Tax, check the box and click on Refresh button or press Alt+R.
![]() Other Filtration methods : If you want to see the records with 12.5% sale tax but having no purchase tax then select the sale tax from the list and check the blank purchase tax box and click on Refresh button or press Alt+R.
Other Filtration methods : If you want to see the records with 12.5% sale tax but having no purchase tax then select the sale tax from the list and check the blank purchase tax box and click on Refresh button or press Alt+R.
Deleting Taxes :
The Taxes can be deleted in two ways-
![]() To Delete Current Tax : In order to delete the current tax > press Delete. Click Save button or press Alt+S in order to save the changes.
To Delete Current Tax : In order to delete the current tax > press Delete. Click Save button or press Alt+S in order to save the changes.
![]() To Delete Entire Column Taxes : In order to delete the entire column taxes > select the column and press F3 > Delete dialog box appears click Yes or press Alt+Y to delete all the taxes. Click Save button or press Alt+S in order to save the changes.
To Delete Entire Column Taxes : In order to delete the entire column taxes > select the column and press F3 > Delete dialog box appears click Yes or press Alt+Y to delete all the taxes. Click Save button or press Alt+S in order to save the changes.
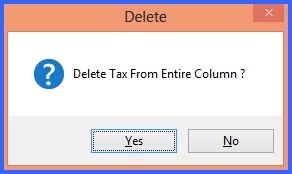
FIG 6. DELETE CONFIRMATION BOX